I’m going to walk you through how I changed fonts on my blog. This only works for WordPress. Every blog is a little different so I hope that you can use this as a guide to figure out how to do it on your own blog. Even though the steps might not be exactly the same for you, I hope it is helpful to see how someone else did it. Feel free to ask questions in the comments and I will do my best to help you out. It takes a few steps to change fonts, but it’s really not that hard!
1. Pick the Font(s) You Want
Go to Google Fonts and browse through the fonts until you find the one that you want. Click the “add to collection” button. If you are going to use more than one font, you can keep browsing and adding to the collection all the fonts you want. Just know that if you have more than 2 or 3 fonts it will slow your site down. You can click the “review” button at the bottom of the screen to see what the font looks like as a paragraph, a header etc. When you’ve made your final decision you can click the button at the bottom that says “use.” Scroll down until you see the table that says “Add this code to your website.” Click the “@import” tab. Leave this browser window open and open a new browser window so we can add the code to WordPress.
2. Log into WordPress
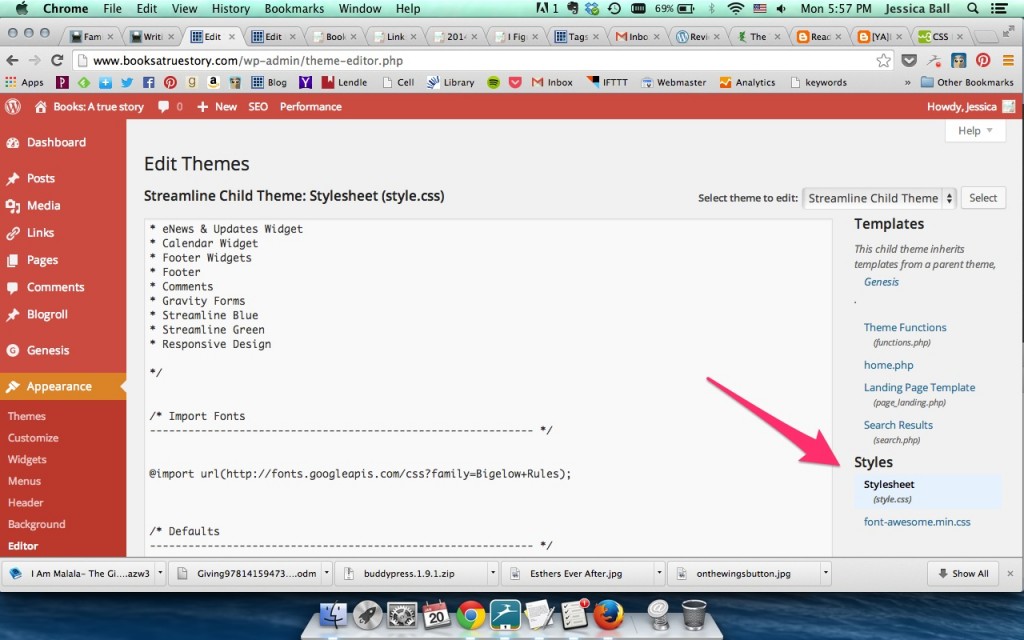
After you are logged into WordPress, go to Appearance in your WordPress menu and then Editor. You are looking for a file on your right that ends in .css. You don’t want to change things that end in .php. Mine is called style.css.
3. BACKUP
Before you change anything in your CSS code, you should select all of it and copy and paste it into a text document that won’t format it in anyway. I use the plain text function in my Text Edit program on my Mac. I know Windows has a similar program though I don’t know what it’s called. Then be sure to save it.
4. Import the Font
At the top, my code has a place just to import fonts. It looks like this.
/* Import Fonts
———————————————————— */
This is called a CSS comment. It’s just for organization purposes and it’s not required. But if you put all your fonts in one place it makes them easy to find. Make sure you place the import code from Google Fonts towards the top of your CSS sheet before any of the code begins. This it what it would look like after you’ve imported your font code.
/* Import Fonts
———————————————————— */
@import url(http://fonts.googleapis.com/css?family=Audiowide);
5. Change the CSS Code
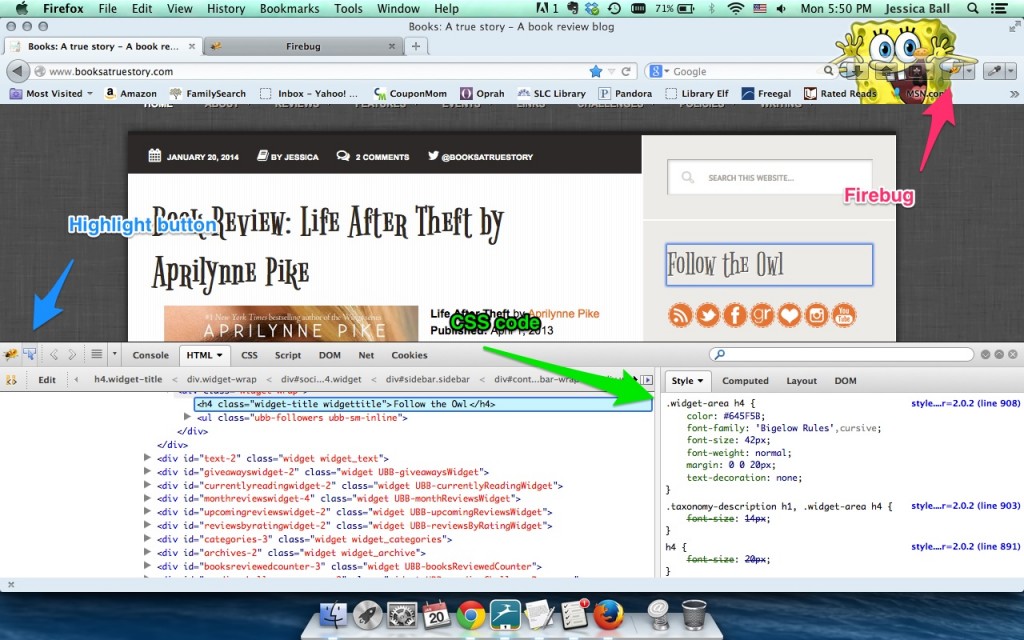
This part can be the trickiest. It can be hard to know what CSS part to change, but there are ways to figure it out. I’m going to show you how I changed the font for just the headers in my sidebar. To figure out how to do that I opened up Firefox and installed the plugin for the browser called Firebug. This can tell you the CSS code for your website so you can figure out what to change on your blog. Once the plugin is installed, go to your blog and click the Firebug button in the top right hand corner.
You’ll get a scary looking screen full of code that will pop up on the bottom. Then click the highlight button. It looks like a blue rectangle with an arrow over it. Then click the area on your website that you want to know the CSS code for. I clicked on the sidebar heading and on the right hand side in the Firebug window it shows me the CSS code that creates that header. Cool huh! This is a great way to learn CSS and what code makes things on your site. Here’s the code that showed up when I clicked on the sidebar header:
So I went back to my Editor on my blog and searched for this code. Once you find it go back to your Google Fonts page and scroll all the way to the bottom. It will give you the font family code which is what you need to change. Mine looked like this:
font-family: ‘Audiowide’, cursive;
Copy and paste the new font-family code over the old one. Be sure to click “Update File” at the bottom of your CSS sheet. And that’s it!
If your site looks completely messed up you can either:
- Look for places where you forgot a closing bracket or semi-colon. That is what usually messes up my code.
- Copy and paste your old code and put it back. Then click “Update File” again and learn CSS a little more :)
If you want to study up on CSS a little more with fonts, you can check out this tutorial. Knowing CSS is important for WordPress blogs and W3 Schools has great and easy tutorials on how to use CSS. They have step by step instructions as well as places to practice writing your own code and seeing how it comes out. When I moved to WordPress I didn’t know anything about CSS and this site taught me so much. Take an hour or two if you are new to WordPress and go through all the tutorials. You’ll feel less lost on WordPress I promise :)
Hope this helps! Let me know in the comments if you have any questions. You can also find me on twitter at @BooksATrueStory.


 My name is Jessica. I love to read Young Adult and classic literature. I’ve been a book blogger for six years and I haven’t gotten tired of it yet. I’m a very curious reader. Writing about all the questions and thoughts I had while reading a book is the best hobby ever.
Wow! Sounds complicated. It feels good to figure something like that out though. Cool!
Great post! I’ve been wanting to learn how to do this for a few months. Should be fun!